Wednesday, October 21, 2015

JavaFx Tutorial For Beginners 4 - How to Use Lambda Expressions to Handl...


import javafx.application.Application;
import javafx.event.ActionEvent;
import javafx.event.EventHandler;
import javafx.scene.Scene;
import javafx.scene.control.Button;
import javafx.scene.layout.StackPane;
import javafx.scene.layout.VBox;
import javafx.stage.Stage;
public class HelloWorld extends Application{
public static void main(String[] args) {
launch(args);
}

@Override
public void start(Stage primaryStage) throws Exception {
Button btn = new Button("Click me");
Button exit = new Button("Exit");
exit.setOnAction(e -> {
System.out.println("exit this App");
System.exit(0);
});
btn.setOnAction(new EventHandler<ActionEvent>() {

@Override
public void handle(ActionEvent event) {
System.out.println("hello world");

}
});
VBox root = new VBox();
root.getChildren().addAll(btn, exit);
Scene scene = new Scene(root,500,300);
primaryStage.setTitle("My title");
primaryStage.setScene(scene);
primaryStage.show();

}
}


JavaFX 8 Event Handling Examples

Using Lambda Expressions of Java 8 in Java FX

Lambda expressions don't work in Java 8

Implement event handler using Lambda Expression

Java programming with lambda expressions

JavaFx Tutorial For Beginners 3 - How to Create Your First JavaFX Applic...


import javafx.application.Application;
import javafx.event.ActionEvent;
import javafx.event.EventHandler;
import javafx.scene.Scene;
import javafx.scene.control.Button;
import javafx.scene.layout.StackPane;
import javafx.stage.Stage;
public class HelloWorld extends Application{
public static void main(String[] args) {
launch(args);
}

@Override
public void start(Stage primaryStage) throws Exception {
Button btn = new Button("Click me");
btn.setOnAction(new EventHandler<ActionEvent>() {

@Override
public void handle(ActionEvent event) {
System.out.println("hello world");

}
});
StackPane root = new StackPane();
root.getChildren().add(btn);
Scene scene = new Scene(root,500,300);
primaryStage.setScene(scene);
primaryStage.show();

}
}


Step by Step: How to build your first JavaFX application

Developing a JavaFX Hello World Application

Your First JavaFX Application

Hello World, JavaFX

Getting Started with JavaFX

Searches related to create first javafx application

javafx application examples

javafx application tutorial

javafx application source code

javafx application development

javafx application icon

javafx application thread

javafx tutorial pdf

javafx tutorial eclipse

Thursday, October 15, 2015

HTML5 Tutorial For Beginners 14 # HTML Video Tag


<!DOCTYPE html>
<html>
<head>
<meta charset="ISO-8859-1">
<title>Html</title>
</head>
<body>
<video controls loop muted width="600" height="300" poster="HTML5.png">
<source src="html5.mp4" type="video/mp4">
</video>
</body>
</html>


Searches related to html video tag

html video tag youtube

html video code

html video tag autoplay

html video player

html video tag controls

html video tag not working

html video tag autoplay loop

html video tag poster

Wednesday, October 14, 2015

HTML5 Tutorial For Beginners 13 # Html5 Section, Header, Footer and Nav


<!DOCTYPE html>
<html>
<head>
<meta charset="ISO-8859-1">
<title>Html</title>
<style type="text/css">
header {
background-color:blue;
color:white;
text-align:center;
padding:6px;
}
nav {
line-height:40px;
background-color:yellow;
height:500px;
width:100px;
float:left;
padding:5px;
}
section {
width:350px;
float:left;
padding:10px;
}
footer {
background-color:blue;
color:white;
text-align:center;
padding:6px;
clear:both;
}
</style>
</head>
<body>
<header>
<h1>Tutorial</h1>
</header>

<nav>
C++<br>
Java<br>
C#<br>
</nav>
"WebContent/13 html5 header nav footer and section f.mp4"
<section>
<h2>Code Tutorials</h2>
<p>
Lorem Ipsum is simply dummy text of the printing and typesetting industry. Lorem Ipsum has been the industry's standard dummy text ever since the 1500s, when an unknown printer took a galley of type and scrambled it to make a type specimen book. It has survived not only five centuries, but also the leap into electronic typesetting, remaining essentially unchanged. It was popularised in the 1960s with the release of Letraset sheets containing Lorem Ipsum passages, and more recently with desktop publishing software like Aldus PageMaker including versions of Lorem Ipsum.</p>
</p>
</section>

<footer>
Copyright example.com
</footer>
</body>
</html>


Searches related to html5 section header footer nav

html5 header footer template

html5 header footer example

html5 header footer main

HTML5 section • header • footer

HTML5 section, aside, header, nav, footer elements

Introducing HTML5 footer, header, nav, article, section

Should you use HTML5 header and footer

Tuesday, October 13, 2015

HTML5 Tutorial For Beginners 12 # Using div Tags to Layout header, navig...


<!DOCTYPE html>
<html>
<head>
<meta charset="ISO-8859-1">
<title>Html</title>
<style type="text/css">
#header {
background-color:blue;
color:white;
text-align:center;
padding:6px;
}
#navigation {
line-height:40px;
background-color:yellow;
height:500px;
width:100px;
float:left;
padding:5px;
}
#section {
width:350px;
float:left;
padding:10px;
}
#foot {
background-color:blue;
color:white;
text-align:center;
padding:6px;
clear:both;
}
</style>
</head>
<body>
<div id="header">
<h1>Tutorial</h1>
</div>

<div id="navigation">
C++<br>
Java<br>
C#<br>
</div>

<div id="section">
<h2>Code Tutorials</h2>
<p>
Lorem Ipsum is simply dummy text of the printing and typesetting industry. Lorem Ipsum has been the industry's standard dummy text ever since the 1500s, when an unknown printer took a galley of type and scrambled it to make a type specimen book. It has survived not only five centuries, but also the leap into electronic typesetting, remaining essentially unchanged. It was popularised in the 1960s with the release of Letraset sheets containing Lorem Ipsum passages, and more recently with desktop publishing software like Aldus PageMaker including versions of Lorem Ipsum.</p>
</p>
</div>

<div id="foot">
Copyright example.com
</div>
</body>
</html>


Searches related to using div tags

using div tags html

using div tags to keep images together

columns using div tags

div means in html

how to create a website using div tags

how do div tags work

div vs span

div formatting

Reflections on Wuthering Bytes

A week or so ago I went to the Wuthering Bytes conference in Hebden Bridge. The event had a maker/hacker/thinker angle I was keen to snoop into, to find out what people were up to in this strange world that seems to have blossomed whilst I wasn't looking.


The presentations began with Prof. Danielle George, who I heard being interview on Radio 4 on the way in to work about her work with radio engineering... from looking deep into space, to controlling jet engines to monitoring field moisture levels for effective agriculture.


Next up Stephen Jagger, gave us an amusing history of an audio engineering company, making microphones and mixer desks for the BBC. My favourite part was about the white lie they told to get their biggest gig. 


Leila Johnston, in unbelievable shoes, shared her work with Hack Circus, a publication that tackles a "geek" subject, but strangley, before it is published always mutates into an art event, and focal point for "community outsiders". 

Towards the end, Leila started drifting into startup self mode, which I loved... including nuggets such as "PUT YOURSELF OUT OF CONTEXT" ... and "USE WHAT YOU HAVE GOT NOT WHAT YOU WISH YOU HAD". I found these messages strangely profound. The mantras kept coming, "BE SUSPICIOUS OF ALL DELAYS".


Jeremy Ruston, the inventor of TiddlyWiki, was a hoot. Like Will Self in voice and laconic langour ( get me trying to use big words Will Self stylee) , he shared a sort hippy take on the last few decades of computing I liked. "NOT EVERYBODY IS LIKE US". ... and "TECHNOLOGY IS CUNNING MADE CONCRETE".

I liked his schtick, the title of his presentation was "Hackability as a Human Right", and he explained how part of the power of "the hack" is that the cost of failure, both in emotional and fiscal terms is minor. You may lose some time and effort, but that's all and when "the hack" works it can be beautiful and flourish. And, to "not hack" is an abdication of "what matters".

Good schtick.


Christine Farion, "the bag lady" demoed her anxiety reducing handbag that shows when the right RFID tagged items are in it and shared some of the history of attempts to use technology to be an aid to our everyday lives. Her research has taken her down the road of ever simpler designs, to the point where they sort of just work the way you'd expect they would. She finished with the line "EVERYTHING IS POSSIBLE - I JUST DON'T KNOW HOW RIGHT NOW".


David Hayward shared his journey through and beyond the world of making video games. There seemed to be a route emerging whereby people aim to be part of big (and literally very bad) industries, get battered whilst making a life and then find more artistic and event-oriented careers.

David shared video games that just didn't make sense revealing a sub culture of people who don't care about shoot 'em ups or driving games, and whose shaping cultural influences weren't Star Wars and Lord of the Rings.

He gets asked "What's your business model?" a lot.


Jennifer Crawford shared battle stories of working with victorian printing machines, and cracking out startup ideas and approaches. So, using the old hot metal typesetting slugs, they now emboss moleskine notebooks, or they utilize Etsy to make prints etc.

But again, they're actually taking an old 2 tonne typesetting machine out on the road as an event/experience. Catch them at the next Ideal Home show apparently.

I reckon they'll get asked about their business model too.


David Mills is a guy who can take a rolled up and stuck together parchment scroll, and using a CT scanner take "slices" through the photo, measure the thickness of the ink. The clever bit is using software to take these spirals, flip them around and thus be able to ACTUALLY READ THE WRITING ON THE SCROLL. Incredible. You may have seen this on the BBC a while ago.

He also X rays his lunch every day and posts it on Twitter.


From I CAN MAKE, Chris Thorpe shared their educational 3D printing projects, but most interestingly defined the difference between hackers or makers or geeks or whatever you want to call them, and NORMALS. I loved their print a working Tower Bridge project, which they run as a lesson IN Tower Bridge. I loved how they created lesson plans and not just 3D models and had a philosophy of "DISRUPT TEDIUM". 


The day ended with Eva Pascoe, who I didn't know I knew ( of ). She was behind Cyberia, the internet cafes way back in prehistoric times. 

I liked it when she spoke of the important of Trust, got everyone to get their phone out, mentioning privacy and Facebook then told everyone to pass their phone to the person beside them and let them have a rummage around. Ha! 

Eva had battle scars from the Cookie wars and sang songs of how the commercial world defeated the engineers,  and lamented how everyone seems to "be resigned to it".  She continues to work fighting for who gets access to data, and is contributing to a World Magna Carta / Bill of Rights for the internet world. 


Monday, October 12, 2015

Javascript Tutorial For Beginners 6 # JavaScript Functions


<!DOCTYPE html>
<html>
<head>
<meta charset="ISO-8859-1">
<title>Javascript Function</title>
</head>
<body>
<h1 id="demo"></h1>
<h1 id="sum"></h1>
<h1 id="sum1"></h1>
<script type="text/javascript">
/*
function functionName (param1, param2) {
function body
}
*/
function printMessage () {
document.getElementById("demo").innerHTML = "Hello world";
}
function add (num1,num2) {
return num1+num2;
}
printMessage ();
document.getElementById("sum").innerHTML = add(100,200);
document.getElementById("sum1").innerHTML = add("hello ","world");
</script>
</body>
</html>


Searches related to javascript function

javascript function onclick

javascript function call

javascript function in html

javascript anonymous function

javascript function list

javascript function apply

calling javascript function from c#

onsubmit javascript function

Sunday, October 11, 2015

Javascript Tutorial For Beginners 5 # If...Else Statements and Compariso...


<!DOCTYPE html>
<html>
<head>
<meta charset="ISO-8859-1">
<title>Javascript IF ... ELSE</title>
<script type="text/javascript">
/*
== is equal to
=== equal value and equal type
!= is not equal to
!== not equal value or not equal type
> is greater than
< is less than
>= is greater than or equal to
<= is less than or equal to
*/
var age = 20;
if (age == 18) {
document.write("the age is == 18");
}
else if (age > 18) {

document.write("the age is > 18");
}
else {
document.write("the age is <= to 18");
}
</script>
</head>
<body>
</body>
</html>


OUTPUT


Monday, October 5, 2015

Intel XDK easy steps to create mobile applications

Intel XDK easy steps to create mobile applications

Intel XDK with our easy to create HTML5-based mobile application, the application is free to use for developers, free and with features that are quite complete.

Additionally, Intel XDK is a tool for developing applications based on the lightweight mobile emulator for application menjaankan directly or by way of debugging. Developers easy with gui-based User Interface design with various Framwork UI such as JQuery Mobile, Twitter bootstraps, Ionic and many more.

Applications can be developed also vary, in the example projects included applications on Intel XDK there that fall into the category of games, and other applications.

In the image above we demonstrated the mobile application of e-learning we developed antrmukanya using HTML 5 using JQuery UI Framwork Mobile.

Sunday, October 4, 2015

HTML5 Tutorial For Beginners 11 # HTML Tables


<!DOCTYPE HTML>
<html>
<head>
<title>My HTML</title>
<style type="text/css">
table,th,td {
border: 1px solid black;
text-align: left;
}
thead {
background-color: red;
}
tbody {
background-color: blue;
}
tfoot {
background-color: yellow;
}
</style>
</head>
<table style="width: 100%">
<caption> My Name Table</caption>
<thead>
<tr>
<th>Name</th>
<th colspan="2">Marks</th>
</tr>
</thead>
<tbody>
<tr>
<td>Jack</td>
<td>Jackson</td>
<td>90</td>
</tr>
</tbody>
<tfoot>
<tr>
<td>Tom</td>
<td>Tomson</td>
<td>80</td>
</tr>
</tfoot>
</table>
</body>
</html>


OUTPUT:

My Name Table
NameMarks
JackJackson90
TomTomson80


Running an application through the emulator intel XDK

Running an application through the emulator intel XDK, Now let's run our application again, as before, click the Emulate in the top menu.

Then the display will be re-routed to Emulate look like the following:

Now, please try to click the button marked "Hello World Button" on our application. Supposedly when the button is clicked will change the text below into reads "Hello World Intel XDK".

On the menu at the top, there is a reload button and slider application to zoom in and zoom out device. Click the reload button to reload the application of the application being diemulate to return to the initial conditions and use the slider to zoom in and zoom out to set the display magnification device.


And on the bar left and right on the display, there are several functions Emulate to help us clicking Emulate our application. There is a menu Device to replace choice of devices that are used to clicking Emulate our application. There are also menu Accelerometer, Device and Network Settings, and Geo Location. It was all to help clicking Emulate us in our application in a wide range of possibilities and conditions.

Now please try to replace the device that we use to clicking Emulate our Hello World application. On the bar to the left, part of the Device menu there is a button dropdown that contains a list of devices that can be used. Click it and select the device you want.

Here is the view of our application in the Nokia Lumia 920:

Even on an iPad:

How to add the code to the action program intel XDK

First of all, in the upper left hand part, on the menu bar at the top of our file hierarchy, click the button Editor.


Then we will be given a code editor view program filled with letters and characters such as the following:


File hierarchy on the bar, make sure that the selected file is the index.html file for ensure that the program code that is currently open is the program code belongs index.html.

Next, let's focus on open source code editor, and let's begin activity coding. The language that will be used are the HTML language, seen from the file extensions that are we open, ie .html. Probably most of you are familiar with HTML language this. For those not familiar, can learn more about HTML language on the module Special Session of the HTML language. Modules are widely available in HTML, books that discuss special about HTML language was widely available in bookstores.
Yes, seriously, we will create mobile applications using HTML language passable familiar to you. Really the HTML language. Additionally there may be in code Javascript which we will add and code of additional libraries. For know how easy, let's get started.
First of all, let's see the result of our work before adding the element on the canvas. Drag and drop the activity actually will automatically generate HTML code. Please scroll your code until you find a code like the following:


If it is difficult to find, essentially find the line the following code:
<div class = "widget-container content-area vertical-col">
We mean program code is program code within the <div> that. If there is a slight difference, no problem, there may be differences when Intel XDK generating code of our program. On the lines of program code below, look at the program code section:


It is a line of code that is generated when we create a Button element. In section indicated arrows, it is the results generated code of attributes that we input when creating the button. There is an attribute Id and Label. Then look also on the line following code:

Can guess and find yourself element is it? Yes, it is an element Text with the id attribute "txtHelloWorld" and Text "first application in Intel XDK". In conclusion, when we do the layouting with App Designer, we actually was to shorten our work step by allowing Intel XDK generate HTML code for our own.
Now, let's go to the stage of the action program giving orders. Please find the line of code the following program:

Seen in the program code line numbers in the picture above, it appears that the lines of code The program is on the line 25-49. Or maybe disparate thin on the line of code program belongs to you. It is a program code by the JavaScript language. On the development of applications using the Intel XDK or other HTML5 applications, command code program for action using the JavaScript language. The above code is the code basic commands are automatically generated by Intel XDK.

Now we will add a code to command the new program of action, we will save the code before the tag on the bottom of the lid element </ script> namely as indicated by arrows in the figure below:
Lines of source code is as follows, please typed in that section:
showHelloWorld function () {
       $ ("# txtHelloWorld"). text ("Hello World Intel XDK");
    }
So the appearance of the lines of program code is as follows:

Perhaps most of you not familiar with the intent of the program code. JavaScript is a language code with an additional jQuery Mobile library (which we have chosen at the beginning of the development of applications). The code is a function named showHelloWorld () that when called will replace text attributes to "Hello World Intel XDK" of an element in applications that have an id "TxtHelloWorld". Where elements in our application that has the id is Text we created earlier. In short, these functions when called will make Text elements that we created earlier changed Text attributes or contents of the text into "Hello World Intel XDK".
Next to be executed, the function must be called first showHelloWorld first. We will call these functions when the button Hello World we have created previously untouched (using a finger on the smartphone or if clicked on a computer PC).
The trick, first find the line of program code that is lines of program code which has generated Intel XDK for buttons that we have made, namely a line of code The following program we have discussed above when we first entered the display Editor code:

Add a new program code on <a> element before the closing tag in the form of elements brackets lid as shown in the arrow in the picture above. Code program are as follows:
ontouchstart = "showHelloWorld ()"
So that the lines of code to the button is as follows:


Visible now that in addition to the class attribute, a data-UIB, a data-role, and id, there is a new attribute that is ontouchstart. This attribute serves to defines that when the elements get a touch on the input form device later (on the PC in the form of clicks), it will call the function showHelloWorld () that we have created and defined previously.
In the next article will discuss how to run an application that we created the Intel XDK emulator application.

Creating Hello World application on Intel XDK


Hello World application on Intel XDK. This time, to try out some of the features and tools on Intel XDK let us make a project application that is simple Hello World application. Let's create a new project using the App Designer.

Creating the Project
At the beginning of Intel XDK, select Start a New Project and select Use App Designer as a method of making a project that we will use.


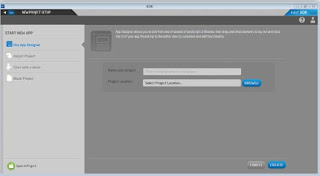
Name the project that will be created with the name xdkHelloWorld and please specify Storage folder location of the project.

Click the Create button to start the process of making the project.

After we finished the project made by Intel XDK, it will appear that
our project has been successfully created and is ready to be developed further. Please close the pop
Success up that appears.


Add the elements of the application
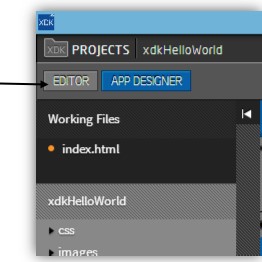
Now, time to start working. On the bar left visible hierarchy file of our project. Please click on the index.html file.

It will open on the bar code editor view of the index.html file.

Then click on the App Designer at the top of the bar to the left to open App Designer toolbar display.


Editor blades then we will turn into blades App Designer and for the first time, we UI framework will be asked to choose which one we will use.

Select the jQuery Mobile framework and click the Select button.


Then the typical appearance App Designer canvas will appear along with our application and we can free activity drag and drop to add elements and melayout elements in our application.

Controls on the bar, on the Form, please drag it onto the canvas a Button element.

So that the display on the canvas will be like this:

With the button we just created is still selected, on the bar Button Settings, contents Label with the "Hello World Button", then check the id and the contents of the "btnHelloWorld".


Charging label is to change the text on the button in the screen display and charging id is to define the id of the key to use in the code program later. Views on canvas of us now is like this:

Next we will add a text in our canvas. Controls on the bar, part Media, drag and drop text to the bottom buttons we have made btnHelloWorld previously.

So that the display on the canvas will be as follows:

Then still with the text that is selected, on the bar Text Settings, Text contents with "My First Application on Intel XDK". Then check Id, and the contents of the "txtHelloWorld.

Then we will look at the canvas as follows:

Addition and layouting elements in our application is enough, now we continue on coding alias clicking the program code. Earlier, let's try our application tests by clicking on the menu button Emulate stages of development in the above.

When the button is clicked, it is likely there will be alert to save the demand for our application if we do not save and please select Yes.

And here is the view of our application is being emulated in the virtual device, for example below is a virtual device iPhone 5:

Quite right? If we click on the button Hello World Button we have made it not there will be nothing. Why? Obviously because we have not instructed any action on the key. Therefore, let us return to Develop by clicking Develop a button on the menu stages of development at the top.

Now, it's time we do the typing activity. Ready for typing? okay, we discuss in the next article for the action program.

Blog Archive


© 2013 Klick Dev. All rights resevered.

Back To Top