Showing posts with label MOBILE DEV. Show all posts

Sunday, October 4, 2015

Running an application through the emulator intel XDK

Running an application through the emulator intel XDK, Now let's run our application again, as before, click the Emulate in the top menu.

Then the display will be re-routed to Emulate look like the following:

Now, please try to click the button marked "Hello World Button" on our application. Supposedly when the button is clicked will change the text below into reads "Hello World Intel XDK".

On the menu at the top, there is a reload button and slider application to zoom in and zoom out device. Click the reload button to reload the application of the application being diemulate to return to the initial conditions and use the slider to zoom in and zoom out to set the display magnification device.


And on the bar left and right on the display, there are several functions Emulate to help us clicking Emulate our application. There is a menu Device to replace choice of devices that are used to clicking Emulate our application. There are also menu Accelerometer, Device and Network Settings, and Geo Location. It was all to help clicking Emulate us in our application in a wide range of possibilities and conditions.

Now please try to replace the device that we use to clicking Emulate our Hello World application. On the bar to the left, part of the Device menu there is a button dropdown that contains a list of devices that can be used. Click it and select the device you want.

Here is the view of our application in the Nokia Lumia 920:

Even on an iPad:

How to add the code to the action program intel XDK

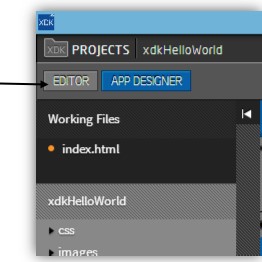
First of all, in the upper left hand part, on the menu bar at the top of our file hierarchy, click the button Editor.


Then we will be given a code editor view program filled with letters and characters such as the following:


File hierarchy on the bar, make sure that the selected file is the index.html file for ensure that the program code that is currently open is the program code belongs index.html.

Next, let's focus on open source code editor, and let's begin activity coding. The language that will be used are the HTML language, seen from the file extensions that are we open, ie .html. Probably most of you are familiar with HTML language this. For those not familiar, can learn more about HTML language on the module Special Session of the HTML language. Modules are widely available in HTML, books that discuss special about HTML language was widely available in bookstores.
Yes, seriously, we will create mobile applications using HTML language passable familiar to you. Really the HTML language. Additionally there may be in code Javascript which we will add and code of additional libraries. For know how easy, let's get started.
First of all, let's see the result of our work before adding the element on the canvas. Drag and drop the activity actually will automatically generate HTML code. Please scroll your code until you find a code like the following:


If it is difficult to find, essentially find the line the following code:
<div class = "widget-container content-area vertical-col">
We mean program code is program code within the <div> that. If there is a slight difference, no problem, there may be differences when Intel XDK generating code of our program. On the lines of program code below, look at the program code section:


It is a line of code that is generated when we create a Button element. In section indicated arrows, it is the results generated code of attributes that we input when creating the button. There is an attribute Id and Label. Then look also on the line following code:

Can guess and find yourself element is it? Yes, it is an element Text with the id attribute "txtHelloWorld" and Text "first application in Intel XDK". In conclusion, when we do the layouting with App Designer, we actually was to shorten our work step by allowing Intel XDK generate HTML code for our own.
Now, let's go to the stage of the action program giving orders. Please find the line of code the following program:

Seen in the program code line numbers in the picture above, it appears that the lines of code The program is on the line 25-49. Or maybe disparate thin on the line of code program belongs to you. It is a program code by the JavaScript language. On the development of applications using the Intel XDK or other HTML5 applications, command code program for action using the JavaScript language. The above code is the code basic commands are automatically generated by Intel XDK.

Now we will add a code to command the new program of action, we will save the code before the tag on the bottom of the lid element </ script> namely as indicated by arrows in the figure below:
Lines of source code is as follows, please typed in that section:
showHelloWorld function () {
       $ ("# txtHelloWorld"). text ("Hello World Intel XDK");
    }
So the appearance of the lines of program code is as follows:

Perhaps most of you not familiar with the intent of the program code. JavaScript is a language code with an additional jQuery Mobile library (which we have chosen at the beginning of the development of applications). The code is a function named showHelloWorld () that when called will replace text attributes to "Hello World Intel XDK" of an element in applications that have an id "TxtHelloWorld". Where elements in our application that has the id is Text we created earlier. In short, these functions when called will make Text elements that we created earlier changed Text attributes or contents of the text into "Hello World Intel XDK".
Next to be executed, the function must be called first showHelloWorld first. We will call these functions when the button Hello World we have created previously untouched (using a finger on the smartphone or if clicked on a computer PC).
The trick, first find the line of program code that is lines of program code which has generated Intel XDK for buttons that we have made, namely a line of code The following program we have discussed above when we first entered the display Editor code:

Add a new program code on <a> element before the closing tag in the form of elements brackets lid as shown in the arrow in the picture above. Code program are as follows:
ontouchstart = "showHelloWorld ()"
So that the lines of code to the button is as follows:


Visible now that in addition to the class attribute, a data-UIB, a data-role, and id, there is a new attribute that is ontouchstart. This attribute serves to defines that when the elements get a touch on the input form device later (on the PC in the form of clicks), it will call the function showHelloWorld () that we have created and defined previously.
In the next article will discuss how to run an application that we created the Intel XDK emulator application.

Creating Hello World application on Intel XDK


Hello World application on Intel XDK. This time, to try out some of the features and tools on Intel XDK let us make a project application that is simple Hello World application. Let's create a new project using the App Designer.

Creating the Project
At the beginning of Intel XDK, select Start a New Project and select Use App Designer as a method of making a project that we will use.
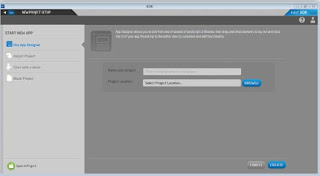


Name the project that will be created with the name xdkHelloWorld and please specify Storage folder location of the project.

Click the Create button to start the process of making the project.

After we finished the project made by Intel XDK, it will appear that
our project has been successfully created and is ready to be developed further. Please close the pop
Success up that appears.


Add the elements of the application
Now, time to start working. On the bar left visible hierarchy file of our project. Please click on the index.html file.

It will open on the bar code editor view of the index.html file.

Then click on the App Designer at the top of the bar to the left to open App Designer toolbar display.


Editor blades then we will turn into blades App Designer and for the first time, we UI framework will be asked to choose which one we will use.

Select the jQuery Mobile framework and click the Select button.


Then the typical appearance App Designer canvas will appear along with our application and we can free activity drag and drop to add elements and melayout elements in our application.

Controls on the bar, on the Form, please drag it onto the canvas a Button element.

So that the display on the canvas will be like this:

With the button we just created is still selected, on the bar Button Settings, contents Label with the "Hello World Button", then check the id and the contents of the "btnHelloWorld".


Charging label is to change the text on the button in the screen display and charging id is to define the id of the key to use in the code program later. Views on canvas of us now is like this:

Next we will add a text in our canvas. Controls on the bar, part Media, drag and drop text to the bottom buttons we have made btnHelloWorld previously.

So that the display on the canvas will be as follows:

Then still with the text that is selected, on the bar Text Settings, Text contents with "My First Application on Intel XDK". Then check Id, and the contents of the "txtHelloWorld.

Then we will look at the canvas as follows:

Addition and layouting elements in our application is enough, now we continue on coding alias clicking the program code. Earlier, let's try our application tests by clicking on the menu button Emulate stages of development in the above.

When the button is clicked, it is likely there will be alert to save the demand for our application if we do not save and please select Yes.

And here is the view of our application is being emulated in the virtual device, for example below is a virtual device iPhone 5:

Quite right? If we click on the button Hello World Button we have made it not there will be nothing. Why? Obviously because we have not instructed any action on the key. Therefore, let us return to Develop by clicking Develop a button on the menu stages of development at the top.

Now, it's time we do the typing activity. Ready for typing? okay, we discuss in the next article for the action program.

Saturday, October 3, 2015

Stages menu intel XDK for developers

If we look at the upper part of Intel XDK applications, there will be a menu like in the picture below:


Each of these menu represents the phase of development on the Intel XDK is as follows:

Develop
This stage is the stage when the application was made and developed. There are two options development at this stage is the Editor and Designer App. In the choice of our Editor Coding and can perform activities on the App Designer options we can do layouting activity.

Emulate
At this stage we make the applications tested to be simulated when running on the device later. There are a lot of menus to perform simulations such as accelerometer, geolocation, Network, Events, and others.

Test
At this stage we create applications that will try to run on the original device. That necessary to perform this stage is that we first need to install App Lab applications on the device that will be a place we try our application. Later, on the App Lab we can open applications that we develop the we push to the server during this test phase. App Lab application is available for devices with iOS and Android platform.

Build
This stage is the stage when we dibuild application into an application for each platform we choose. The way is easy that simply by clicking one of the platforms on the menu in the Build stage is the application we will be uploaded to the server and the server will be returned in the form of an application package that is ready to install or published in the platform that we have chosen

Services
This stage is actually optional additional step if we want to use services provided to do things such as putting an ad in the application us, to track performance of our applications, and others.

After Install Intel XDK Development Tools

 Initial View Intel XDK
At the time of first opened, it will appear as early as the following:

Is presented on the display menu to open the projects that we have made
previously and a menu to create a new project. This time we will try to make
a new project. Please click the Start a New Project.
Now we will be presented with a menu display to create a new project.

At the bar on the left side, there is a choice of the type of method of manufacture projects that will
we make. There are four choices of Use App Designer, Import Project, Start with a
demos, and Blank Project:
  1.  Use App Designer: Using the method of making this project, we will given some JavaScript UI library that we can choose to make look at our application. We are also given the ease by drag and drop when adding and do layouting elements in our application.
  2. Import Project: This project the manufacturing method used when we want import project that has been created before using Intel XDK version previously, App Starter Wizard, or others that are compatible with Intel XDK. 
  3. Start with a demo: Method for making a project using demo applications that already provided by Intelligence as example.
  4. Blank Project: This project the manufacturing method is used if we want to make projects that really from the beginning and at the beginning made only contains a directory Intel standard XDK and the initial HTML file. However, when in the midst project development if you want to use the App Designer, still can use it by clicking on the menu already Designer App provided.
Please select Start with a demo, then select one of the demo application is provided in right menu and click Next. In the next screen, please give the name of the project and select the storage location of the project folder and click Create.

Glance Stages of Development at Intel XDK, If we look at the upper part of Intel XDK applications, there will be a menu as the next article will discuss based on the function menu.

Installsi Intel XDK Untuk Mengembangkan Aplikasi Mobile

Proses Instalasi Intel XDK, Pada postingan ini kita akan menginstal Intel XDK Development Tools. Mari kita ikuti langkah langkah berikut ini secara seksama.

Hal pertama yang harus kita lakukan adalah mengunduh installer Intel XDK dari website resmi Intel XDK (http://www.html5dev-software.intel.com). Untuk masuk halaman unduhan klik tombol Preview Intel XDK New.
Adapun requirement untuk instalasi dari Intel XDK New ini adalah sebagai berikut:
  1. Microsoft Windows Operating System
  2. Internet Access
  3. Etc.
Langkah 1
Setelah masuk halaman unduhan seperti di bawah ini, klik tombol Download Intel XDK New.
 

Langkah 2
Oke, selanjutnya setelah file installer selesai diunduh, mari kita lakukan proses instalasi. Prosesnya cukup simpel dan mirip dengan proses instalasi program lainnya.
Langkah 3
Klik installer, maka akan ada langkah-langkah instalasi selanjutnya.

Langkah 4 
Selanjutnya pilih destinasi folder untuk instalasi Intel XDK ini, folder default seperti di bawah ini.
Langkah 5
Setelah proses instalasi berhasil maka akan tampil pada list programs.


© 2013 Klick Dev. All rights resevered.

Back To Top